Ambient guitar swells are the most satisfying sound that I have heard. They create such spacious, large and ambient sounds. It’s amazing! Learn how you can make guitar swells yourself with plugins inside your DAW.

There are a couple of steps that you need to follow when you want to make ambient guitar swells. In this article, we will check them one by one.
- Setting up your EQ and Amp Simulator
- Adding a mono delay
- Adding a slower delay
- Adding Ping-pong delay
- Adding a Reverb with modulation
- Adding a 2nd more natural reverb
- Manually adding the volume swells
- Adding pitch shifters to create extra high and low tones
Why I Like Ambient Guitar Swells
Ambient and atmospheric guitar pads and swells can be incredibly beautiful. Their sound can be so deep and intriguing. I think for me as a guitarist it always makes me feel great when I play them. It’s almost like playing an organ or some other ethereal instrument. And also the creative possibilities are endless. You can make an entire song or composition out of them or you can use these ambient guitar pads to give your
Download 192 Beautiful Ambient Guitar Swells for Your Music
What Plugins Do You Need To Make Guitar Swells?
Here is a list of plugins that you will need:
- Any DAW
- An amp simulator
- EQ
- Delay plugin
- Reverb
- Pitch shifter
In this tutorial, I used Native Instruments Guitar Rig 6 as my amp simulator, SoundToys Echoboy for the delay and Valhalla VintageVerb and Valhalla Room as my reverb. My DAW of choice is Cockos Reaper and I use the ReaEQ and the ReaPitch from Reapers stock plugins.
Video Tutorial: How to create ambient guitar swells with plugins
If you prefer to see how I make my ambient guitar swells in my DAW step by step, then check out my

Step one: Setting up your EQ and Amp Simulator
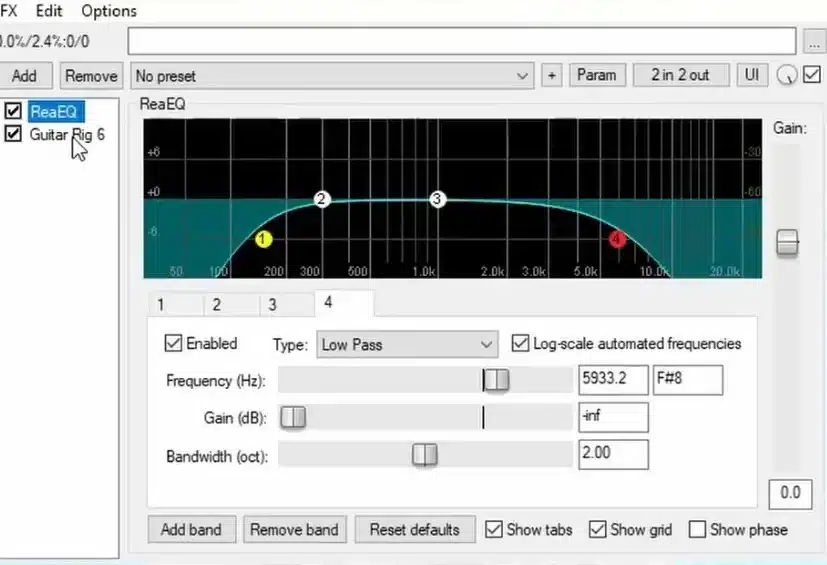
In the real world, most guitar amps don’t project any sound lower than 150 Hz and higher than 6kHz. When you record directly into your interface, you do have these frequencies in your signal. Therefore, before the amp simulator, we will place a Low pass filter at 6. kHz and a high pass filter at 150 Hz.
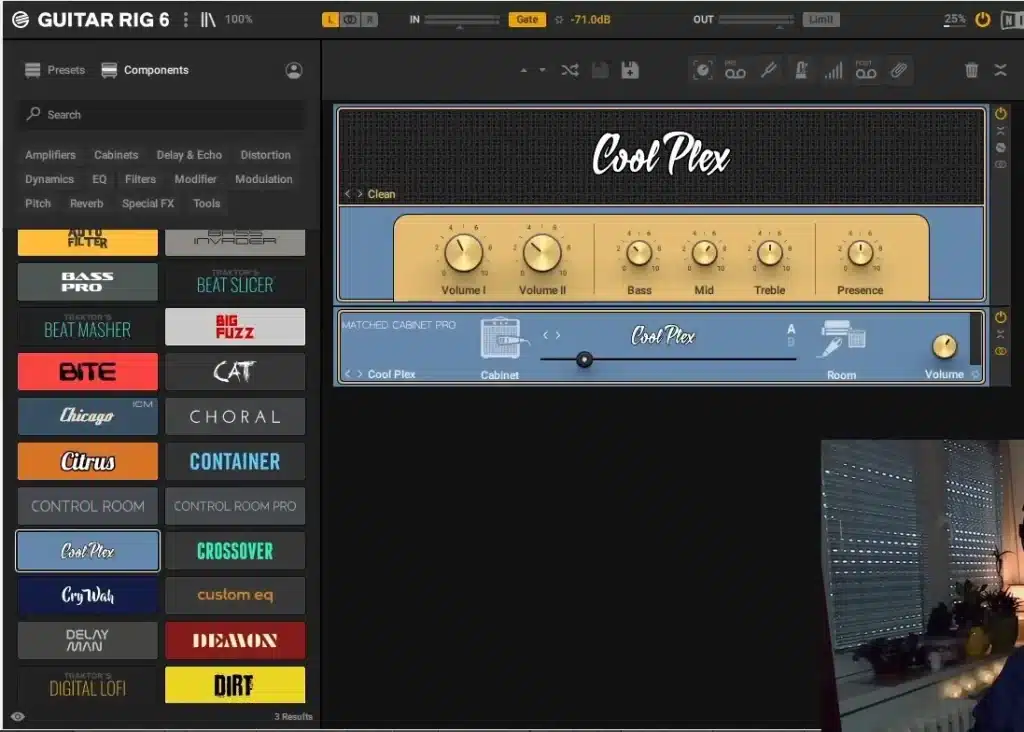
For guitar swells I prefer to have a clean sound. That’s why I have a simple and clean setting on my Native Instruments Guitar Rig 6 amp.
Step Two: Adding the first delay
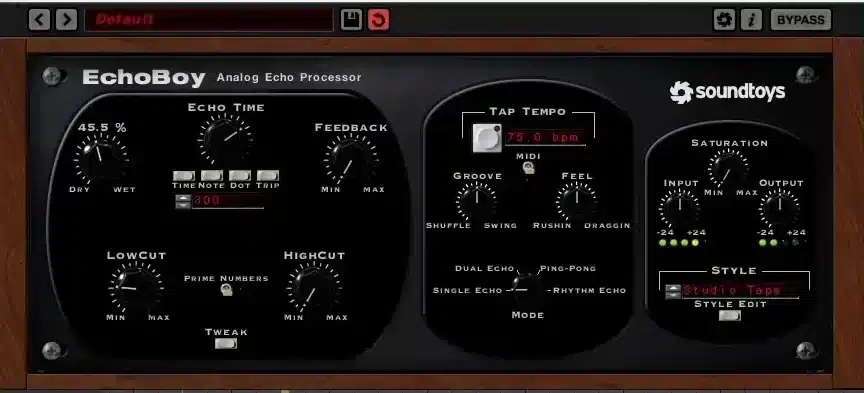
In this tutorial I am using the Echo Boy delay plugin from Soundtoys. But any delay plugin should work.
You place the mono delay directly onto your guitar track and set it to 45% wet signal. Add some low cut and unlink your delay from the project tempo if it has this option. Because you want to set the tempo manually. For this tutorial, I found a delay time of 300 ms. works best.
Add a nice amount of feedback (around 50%) to get some repeats and optionally you can add some saturation.
Step Three: Adding a 2nd slower delay
The second delay that you should add needs to be slower and in a different tempo than your first delay. Because that’s how the repeats start to interact nicely and create interesting rhythmic patterns.
This time you add a low and a high cut. This will push the delayed sound a bit to the background and make it blend better.
Set the delay time to about 500 ms. and crank up the feedback of course.

Step Four: Adding a Ping-pong delay
You can use any delay that has a ping-pong option or something similar. This will create a stereo-like effect. First, the sound will go to one side and then to the other. I suggest you use different delay times for each side. And don’t forget to unlink the delay from the project tempo!
Finally, you also want to add a bigger low cut and a slight high cut on your delayed sound. And of course add a nice amount of feedback!

Step Five: Adding a Reverb with modulation
Add the reverb directly to your track. Because the reverb plugin is not on an aux track, you should turn the mix down to about 40%. And no pre-delay, because you want the reverb to kick in straight away. Also, you don’t want to have a very long reverb decay time, because you already have this from your multiple delays.
Because you have no pre-delay, the attack of your chords is softened a bit.

Step Six: Adding a 2nd more natural reverb
This reverb is going to be a more natural reverb that has less modulation. Again not pre-delay and set the mix to about 35%. The decay time will also be less than your first reverb.

Step Seven: Manually adding the volume swells
Because I don’t have a volume pedal, and also because I want to be able to edit the swells afterwards, I will record the chords first.

Then I will add fades inside my DAW on each chord. This effectively cuts of the attack, and I have full control over my guitar volume swell. Here is what that looks like:

No attack, a smooth volume fade and the string squicks at the end are cut out.
Step Eight: Adding pitch shifters to create extra high and low tones
To create extra deep sounds and extra brilliance to your guitar swells, you need to add some pitch shifters. And the best thing is to add them right after your delays. In my YouTube tutorial I used three separate shifters. One that adds a lower octave, one that adds an octave on top, and finally one that adds two octaves! You can blend these shifters to taste.

What Chord Shapes Are Best For Ambient Guitar Swells?
My main advice is to keep it simple and widely spaced. Don’t use full chords or full bar chords. Just play a couple of notes (three maximum). Especially when you use pitch shifters you will already have a lot of notes in your sound. At the end of my YouTube tutorial, I go more into depth about this topic.
In general, I only play the root note, the fifth and the third. And exactly in that order. If you do it like this, your chord will automatically be nicely spaced and transparent!
Suggested Video Tutorial: The Easiest Arrangement Tip For Better Songs & Clean Mixes
Do your mixes sound dull and muddy? Check out my video tutorial on the easiest arrangement tip for better songs and clean mixes!

Video Transcript
Ambient and atmospheric guitar pads and swells can be incredibly beautiful.
You can make an entire song or composition out of them or you can use these ambient guitar pads to give your
Today i’m going to share with you my approach for creating ambient guitar swells and pads.
So let’s get creative!
For today i used my fender stratocaster which is set to its neck pickup, which is recorded directly into my audio interface. As an amp simulator i use the clean preset from Native Instruments Guitar Rig 6. And to create the swells and ambience i used EchoBoy from SoundToys for my delay and Valhalla VintageVerb and Valhalla Room as my reverb.
At the end of this video i’ll also dive into what kind of chords and chord progressions work the best for these kind of ambient pads and swells. So be sure to stick around for that! And many tips that i show you in this video can also be applied to real life guitar pedals and guitar amps. So this is what our final result is going to sound like:
What i love about this sound is that you have so many layers going on at the same time while it’s just one instrument. And i think it’s definitely a sound that you might have heard before. So now let’s try to recreate the sound.
I want to show you what the settings are on my amp simulator and also what EQ i’m using before the amp simulator. So before my signal enters the amp simulator here i’ve placed an EQ with a high pass filter and with a low pass filter. The high pass filter is around 153 hertz and the Low pass filter is around 6k. And i do this to filter out some of the frequencies so that my signal is a bit cleaner and then after that the signal is sent to the guitar amp simulator Guitar Rig 6. And mostly i prefer a clean preset so that i have more room to sculpt the sound afterwards.
So this is what the chord progression sounds like after the EQ and amp simulator:
So it’s a nice clean sound and actually nothing special is going on. And as you might have noticed i did not add any volume swells yet because i’m going to do that later on in the DAW, because i feel that i have more control when i do the fades in the DAW itself. Also it’s more flexible because you can still change things afterwards.
So the first thing i’m going to do is i’m going to add a delay to this track. And as you might have remembered in my last video about how to create an atmospheric clean guitar sound i put all the delays and reverbs on send tracks or on aux tracks But this time i’m going to do it differently, this time i’m going to add all my delays and my reverbs on the same track as my audio.
So this first delay will be a single echo. So it will not create any extra stereo information and i’ll leave my mix until around 45 percent and a little bit of a low cut. And i’m going to unlink it from the project tempo.
So the first thing that i’m going to be doing is i’m going to be adjusting the delay time. I don’t want the delay time to be too fast but i don’t want it to be too slow as well. So i’m going for something in the middle and i found out that around 300 milliseconds is something that sounds nice.
So now that i like the delay time now it’s time to adjust the feedback to get enough repeats. And i’m just going to crank it up until let’s say 50 percent. And that sounds nice and i also want to add a little bit of saturation to the delay to just give it a little bit of a rough edge.
So now it’s time to move on to our second delay and again this is going to be EchoBoy from SoundToys and this delay is going to be a little bit slower than the other one. I want the delays to interact and to create interesting rhythmic patterns so that’s what i’m going to be listening for.
Again i’m going to add a little bit of a low cut and a little bit of a high cut, because i want this delay to be a little bit in the background. I want it to blend a bit better. I just played around a little bit with the delay time and i found out that around 500 milliseconds is the sweet spot for me and again i’m going to crank up the feedback. And now let’s give it a listen. Probably you can hear that we’re already getting some reverb textures by only using these two delays.
But now that i have these set it’s time to move to the third delay and this third delay is going to be a ping pong delay. Again i use the EchoBoy but you can use any delay that has the ping pong mode.
Again i’m going to unlink the delay from the project tempo and i want to have one side that’s a little bit faster and the other side a little bit slower. So what’s going to happen first the signal will be sent to the left channel with a delay of 424 milliseconds and then the signal will be sent to the right channel with a delay of 233 seconds. And then it’s going to go back and forth. That’s why it’s called ping pong 🙂
Now again i’m going to crank up the feedback because i want a lot of repeats but now i’m going to add a little bit more of a low cut because i don’t want to have too much low frequencies in my side channels. And also i want to add a little bit of a high cut for the signal to blend in a little bit better.
Okay now it’s off to the reverb! So my first reverb is going to be Valhalla VintageVerb.
I want to have a reverb that has a little bit of a chorus effect, so you want to have a large space with a lot of modulation.
So if you would have this reverb on an aux then you’d want to have it on 100% wet, but in this case i don’t want it to be 100% wet because it’s on my original track. So i’m going to lower the mix down to about let’s say 40% because i don’t want too much and there’s going to be no pre-delay. But i’m going to change the decay time because this is way too much. And i’m changing the decay time because i don’t need the decay time from the reverb.
I just want the ambience because i already have the long tail going on from the delays.
So i’m going to set it to about 2.8 seconds and also what this does it also softens the attack of the chords a bit. Okay so that’s starting to sound very nice.
Now i want to add another reverb and the next one in line is the Valhalla Room. And i’m going to set it to a hall reverb because i want the natural ambience with not that much modulation. And again i’m going to adjust the wet to about 40 % i don’t want too much. No pre-delay and i’m going to lower the decay time.
You can already hear some very nice frequency mixes going on. It’s already sounding… So ambient.
But the thing is we did not add the volume fades, so i’m going to be doing that manually by cutting all these chords and making them into separate clips. So here’s the final result: i’ve made fades in the beginning and i cut off the string squeaks at the end and now it sounds a lot cleaner.
But as you might have noticed we’ve also lost quite a bit of volume because of this. So i need to compensate for that. So i’m going to crank up the volume on the amp simulator and also i’m going to add a little bit of volume on the track itself. Now it sounds like this:
So this is already a very beautiful sound and you can even stop here if you want. But we can also take it one step further and add more low tones and more high tones to the sound and we do this by using a pitch shifter.
So here i’ve added the pitch shifter but the thing is i added it before the reverbs. So now it comes straight after all of my delays. So normally the pitch shifter is used to adjust tones and to only have the wet sound but the thing is i want to blend both.
So i’m going to raise the dry sound and i’m going to lower the wet sound to about -6.7 db more or less. So now i’m going to add separate shifters. So i want to add one that lowers everything with an octave, so here i’m going to shift the wet sound with an octave down and i’m going to boost this with 2db / 2,5db. So that means that we get extra bass tones to our sound. Let’s have a quick listen.
So especially on the last chord you could really hear that extra octave added to the bass. So i’m going to add another shifter but this time i’m going to raise it with an octave to create more high tones. So the only thing that i want to change, i want to change the volume of the shifter because i find that the high tones can be a little bit intrusive and they sound a bit unnatural. And they’re too loud so i’m changing it to about -7 or 6 db.
and just a quick comparison:
So you see we’re getting a lot of extra frequencies and the sound just turns a lot thicker.
And now as a final detail and it’s going to be a very subtle detail. I want to add one extra pitch shifter but it’s going to add two octaves. But i’m going to blend this in very softly. When i solo this shifter let me show you what this sounds like. And i’m going to raise the volume so that you can hear it again:
So you see you don’t want that too loud in the mix.
So i’m going to lower it with about 20db because i really just want it to be a detail.
And then voila! Our final sound sounds like this:
So just on a side note: you don’t have to use these pitch shifters. If you like the sound as it was then just use the sound as it was, it’s also beautiful.
So now let’s talk about what kind of chords are most suitable for these ambient pads and guitar swells. The thing is you want to stick to simple chords and this is for a good reason. Normally in Pop
When you keep the chords simple and nicely spaced the sound does not muddy up that easily. And also you should not forget that when you add a frequency shifter you add a lot of tones that were not there in the bass but also in the higher frequencies.
So for example: if i would add an extra lower octave all of the notes will have an extra octave added and definitely in our bass we want to try and keep things as transparent as possible. So in general you only want to play the root note, the fifth and the third. Occasionally you can also play the ninth instead of the third, or maybe the fourth but try to keep it simple and transparent.
For this episode i’ve created a sound pack with all kinds of ambient guitar pads and swells that are ready to use in your compositions. The pack is available on my membership page and you would really support the channel and the creation of new videos by checking it out!
In any case i hope that you enjoyed the beautiful sounds that we’ve created today. Don’t forget to like share and subscribe to the channel and for now…
See you next time!